

Posted on: 2019-12-30
 Hub
HubFor all things cosmetics and toiletry making!
Going into 2020 we wanted to add that final bit of sparkle! So we made a series of Glitter Gel Candles by playing with our Bio-Glitter® and EcoSparks ranges!
Did you know our sister company sells gel candle wax? So you can make your own amazing candles and experiment with colour and styles to create some wonderful creations!
You must remember, especially as a child, going into shops and seeing those gel candles?! The ones you just had to poke, accidentally put a hole in and then pretend it wasn't you! I think we have all done it!
Well why not make your own? Extremely simple for a beautiful outcome! These candles are a first for us so we are learning just as much as you. However they have come our rather well so we wanted to share them with you!
We have used glitter from our Bio-Glitter® range. Our Pure selection is 100% plastic free, aluminium free and biodegradable. However Bio-Glitter® is flammable, being made from cellulose (as per paper or wood) but then so is the wick. After being in contact with Bio-Glitter® themselves, we worked with the glitter to see if our ideas would work and found no issues. Please be warned this is our own experimentation and we can't not take any responsibility for issues that occur during your own creations.
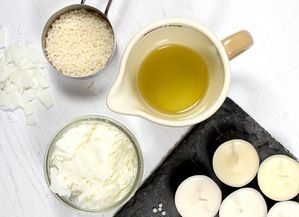
• Large Saucepan
• Heat Proof Jug/Bowl
• Thermometer
• Spatula/Mixing Spoon
• Suitable Containers (we used a mix of glass jars and drinking glasses)
• Wicks & Sustainers
• Wax Glue Dots (from SFC)
• Candle Gel Wax
• Bio-Glitter® Pure
• EcoSparks Mica Based Glitter
• Isopropyl Alcohol (IPA)
We haven't put exact quantities as we just experimented with a variety.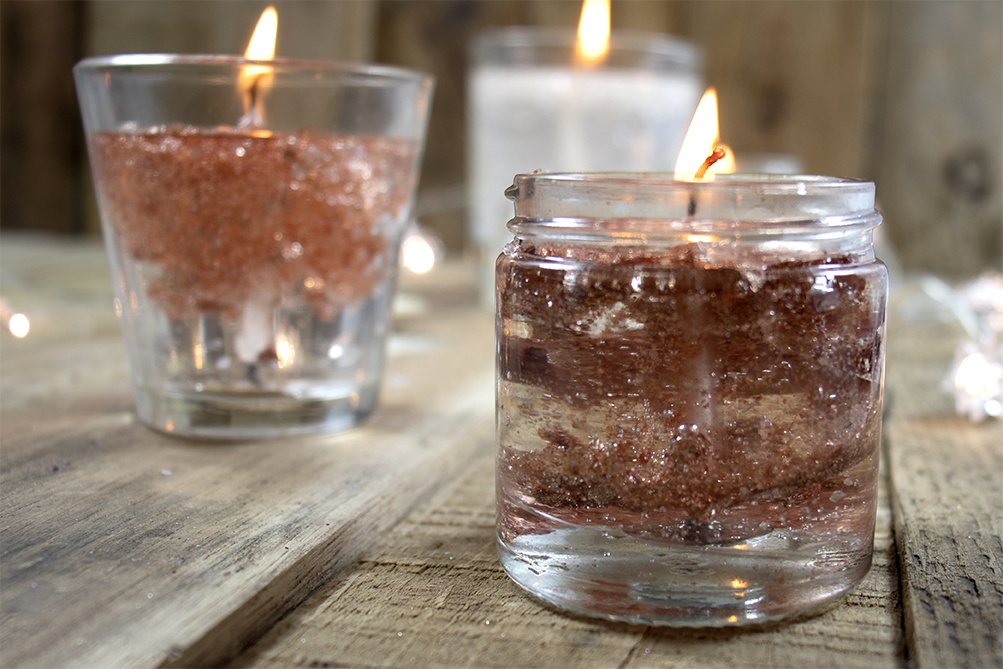
Firstly weigh out your ingredients and prepare a water bath. Do this by suspending a heat proof dish above a pan of boiling water. This way you will avoid direct heating.
Secondly place your candle gel wax in your heat proof dish and leave to heat. The temperature can't go above 95°C, you want to aim for 90-95°C. Your gel with change to a runny consistency.
If adding colour and fragance (see below for more information) this needs to be done now.
Fix your wick to the bottom of your chosen container/s using the glue. Ensure they are lined up correctly. You can also use a holder to keep it in place.
This next bit is dependent on preference. We trialled a few different ideas to see what outcomes work best.
Using a tiny bit of IPA we sprayed the inside edges of our chosen glass. Then sprinkled plenty of Bio-Glitter®, enough to cover all sides. Then once our gel was at the correct temperature we poured into our glass. At the same time sprinkling more glitter as we poured.
We also trialed mixing some of our Bio-Glitter® with EcoSparks. We then poured a small amount of gel into our glass, dusted with our glitter mix, then another gel layer etc. Alternating the layers to create another final look.
Each glass was a different experiment to see what works well. Once you are happy, leave your gel to set.
Once set you can use your wonderful Glitter Gel Candles!
We do not have experience with fragrance in this product. It is however our understanding that gel candle waxes usually have a max fragrance load of 6%. From a safety point of view we would advise using a non-polar fragrance with a flash point in excess of 77°C. Please also be aware that adding fragrance or oil could effect the structural integrity, colour and turbidity of the product. It may be coloured by using fat/oil-soluble dyes and colours, and fragranced using fat/oil-soluble perfumes.
Check out our range of wonderful products on our website:
The Soap Kitchen

Plus, stay up-to-date with the latest news, tips, offers and inspiration from members of The Soap Kitchen community.
.png)
.png)


Leave a comment
Login to post comments