
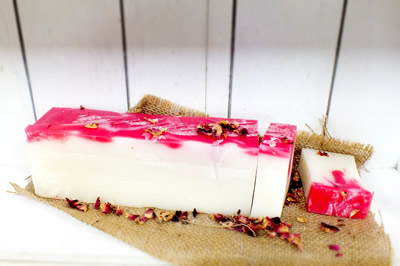
Cold Process Watermelon Soap
If you've never made natural cold process soaps at home before, you'll need to make sure you have the equipment and utensils before you start. This recipe makes a layered cold process soap which is not a beginners recipe, so we suggest you practice your basic soap making skills before attempting this or any other more complex recipe.
Why not view our simple tutorial on You Tube
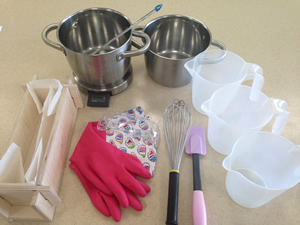
YOU'LL NEED.....
1) Two good sized stainless steel or enamelled saucepans.
2)Three heat-proof glass measuring jug or plastic jug able to withstand boiling water.
3) Accurate kitchen scales.
4) Utensils for stirring etc. i.e. Wooden or stainless steel spoons, a balloon whisk or rubber/wooden spatular, or similar.
5) Two (preferably) cooking/brewing thermometers (although 1 can be used fairly successfully)
6) A mould to pour the liquid soap into whilst it sets. A wooden or cardboard tray or box lined with grease-proof paper or siliconised baking sheet is great. Silicone cake-baking moulds are also suitable, as are some other forms of plastic moulds such as 'tupperware' containers.
7) Eye and hand protection (safety glasses and rubber gloves).
8) A blanket or large towel.
INGREDIENTS Stage 1 (Red Layer)
This is a layered soap so the ingredients below are for the Red layer of this soap.
8 oz (227g) of cold, clean water
84g of
sodium hydroxide (caustic soda) beads or pearls 10.7 oz (303g)
olive oil (preferably pomace grade but virgin or extra virgin will do) 6.7oz (189g)
coconut oil (hard variety) 4oz (113g)
palm oil (hard variety) 1/8 tspPoppy Seeds Small amount of Water Dispersible Red Pigment 10mlEssential Oil of your choice
INGREDIENTS Stage 2 (White and Green Layers)
This is a layered soap so the ingredients below are for the Red layer of this soap.
4 oz (113g) of cold, clean water
41g of
sodium hydroxide (caustic soda) beads or pearls 5.3 oz (151g)
olive oil (preferably pomace grade but virgin or extra virgin will do) 3.3oz (95g)
coconut oil (hard variety) 2oz (57g)
palm oil (hard variety) Small amount of Water Dispersible Green Pigment
Small amount of Titanium White Pigmentwhich will need to me mixed to a runny past in a little water.
10mlEssential Oil of your choice
Step 1
This is a 2 stage soap with 3 layers so make sure you have all the ingredients and equipment listed above BEFORE you start and weigh them out into suitable containers ready to use, stage by stage.This recipe is for an advanced soap maker, if you are a beginner please read our Natural Simple Cold Process Soap Recipe first
Always wear safety goggles/glasses and use protective gloves when soap-making to avoid injury from spills and splashes.
Step 2
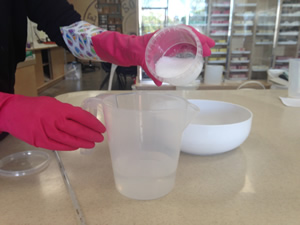
Carefully add the sodium hydroxide to the water, stirring all the time with a spoon or spatula. Be careful not to breathe the vapour that is initially given off, so hold your breath and stir until all the sodium hydroxide has dissolved and there are no lumps stuck to the bottom of the jug.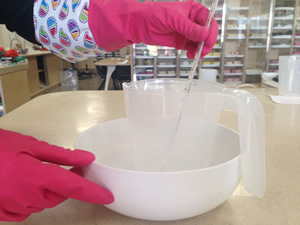
Step 3
Place one of the thermometers into the solution and leave to one-side. If you want to speed the cooling, place the jug in a large bowl of cold water, being careful not to 'float' it.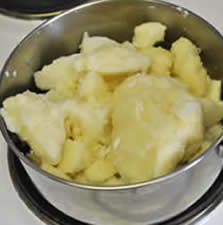
Step 4
Add the coconut oil and palm oil for stage 1 into one of the saucepans (the smaller if there is one) and gently melt it on the stove. Don't overheat it, just melt it. When there are tiny pieces of solid oil still left to melt, turn off the heat and leave until completely liquid.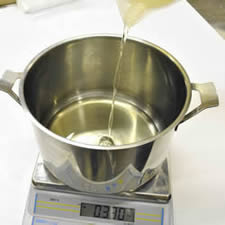
Step 5
Whilst the solid oils are melting, measure out the olive oil (pomace grade is best) into the other saucepan (this will be the soap-making pan). Add the grapefruit seed extract to the olive oil now (Stage 1 only, not used in Stage 2).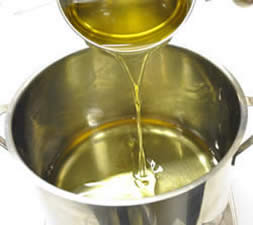
Step 6
Once melted, pour the combined coconut and palm oils into the olive oil and mix them all together.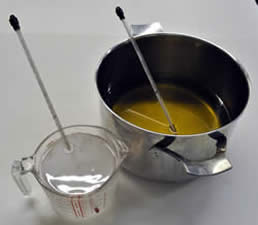
Step 7
Place the other thermometer in the pan of oils. You should end up with a thermometer in each of the lye and oils as shown above. Important... Keep an eye on the temperatures of both the oils and lye. Once both are at near similar temperatures they can be combined. Don't let everything get too cool. As a guide a minimum of around 26°C and a maximum of around 54°C are ideal limits of temperature. If you need to cool your lye quicker, place the jug in a bowl of cold water (careful not to float it).

Step 8
When at the correct temperatures, slowly and carefully pour the lye into the oils, and start stirring (preferably with a hand (balloon) whisk to ensure the mixture all starts to chemically react and combine (saponify).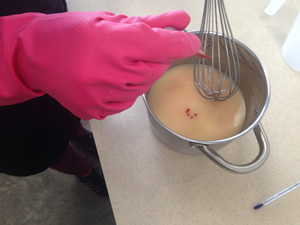
Step 9
As you see the mixture thicken but BEFORE the trace, add your red colour. There's is no precise amount; just add a little at a time until the desired shade is achieved. We used 0.5ml of Water Dispersible Red Pigment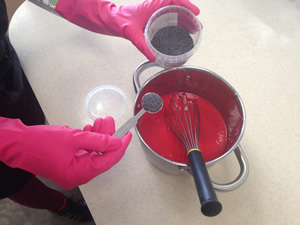
Step 10
After reaching trace add your poppy seeds adding enough to be obviously visible like seeds in a watermelon (we used 2 teaspoons) and then add your essential oil, stirring in well.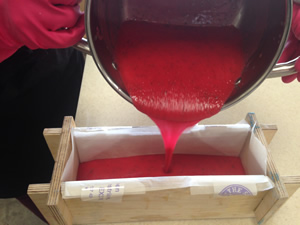
Step 11
Now pour it into your lined mould as the bottom layer and leave to gel. A gel stage will be reached in just a few minutes. Now it’s time to make stage 2, repeat steps 2-8.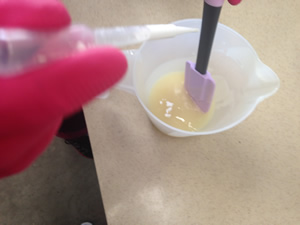
Step 12
For the second (white) layer, as you reach a light trace in stage 2, pour 1/3 of your soap into a jug (approx. 150g) leaving 2/3 in your pan. Take the jug with this smaller amount in and add your colour (titanium dioxide in water), again there is no precise amount, just add enough until the soap mixture turns obviously white. It is important to now work as quickly as possible to get the second layer (white) poured. Also, periodically slowly stir the remaining soap in the pan to keep it from setting up too soon.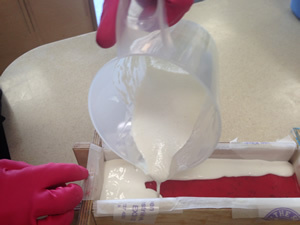
Step 13
Now pour this white layer on top of the now gelled red layer. Pour it carefully from a low height and if there is any possibility that the red layer is not fully gelled it may help to pour over the side of a spatula or back of a large spoon to help prevent the white layer from mixing into the red one below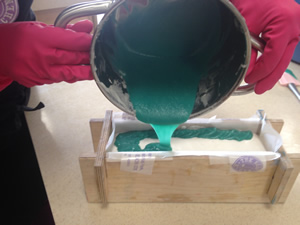
Step 14
Now add the green colour to the remaining mixture in the saucepan, and stir in thoroughly. (again, there's no precise amount, but add a little at a time until you get to the colour you want). Add the essential oil, stir in and you're ready to pour this final layer, but there's one further thing to remember.... reserve a little of the soap for final decoration. So now in the same way as you poured the white layer, pour MOST of the remaining soap on top of the other layers and if necessary use the side of a spatula or back of a spoon to help this layer not to mix with the one below in case it's not fully gelled.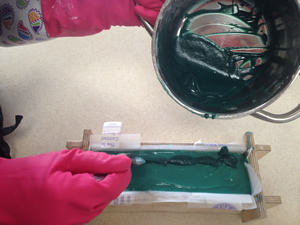
Step 15
Finally, using the small amount of reserved green soap, add a little more green colour, just to darken it a little, then pour or spoon this slightly darker green soap in lines across the surface of your soap. This adds a striped appearance similar to a real watermelon.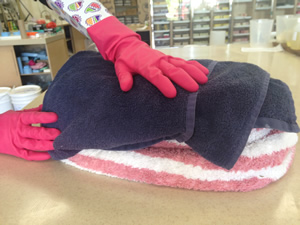
Step 16
Cover the mould with something like a cardboard sheet to prevent anything touching the surface of the soap whilst it's setting.Insulate with old towels or a blanket and leave at room temperature until the soap has solidified. With a small batch like this it should be no more than 24 hours. Larger batches can take longer.
Step 17
Once set and cool, remove the soap from the mould and remove any lining paper from the soap. At this stage it will be a soft solid and can be easily cut into bars or smaller blocks if desired. If it appears too soft to handle, leave it for 2-3 days and try again.Step 18
Leave your soap 'curing' at room temperature for typically at least 3-4 weeks, preferably on a sheet of uncoloured absorbent paper allowing air to circulate around each bar or block. Curing will allow the soap to loose excess moisture and become harder.Important...
Do not store your soap in a cold place. Soap will 'sweat' if cured or kept in a cold or cool place and then moved to a warmer one. Avoid 'sweating' by keeping your soap at a constant room temperature.Tips
If packaging your soap, avoid absorbant paper or card coming into contact with your soap directly as any 'sweating' of the soap once packed will spoil the packaging. If you must use paper or card, wrap your soap first in something like waxed or siliconised paper or plastic film.
Note... If using higher grades of olive oil it will usually take longer to reach a trace. Pomace grade is ideal for soap making.
If adding fragrance use pure essential oil/s (20ml in this recipe size). Avoid fragrance oils until you're more experienced. See information below.
Suitable and simple-to-use colourants... Ultramarines: Oxides: Water Dispersible Organic Pigments: Insoluble pigments which are used to colour the oils: Some food-safe dyes (sold as water soluble powders)...e.g. Tartrazine yellow: Sunset yellow (orange): Amaranth red: many types of ground spices i.e. Turmeric: Paprika: Cinnamon.
Useful Information...
If you're using this recipe as a base for a soap you're adding your own colours and fragrances to, take a note that in your early attempts at natural soap-making it is far easier to fragrance a soap using pure essential oils. Avoid most fragrance oils as they are often alcohol based (something like dipropylene glycol) and virtually all forms of alcohol can cause 'siezing' in a soap mixture. This is when the mixture starts to set solid very rapidly, before you have a chance to pour it, ruining all your efforts. Also, bear in mind that many 'pretty' additions to a soap such as dried flower heads etc. will very possibly turn brown and discolour the soap if added to the mixture whilst it is a liquid. This is because of the high water content and caustic nature at that stage. Additions that work well are dried pulses, spices and some woodier dried herbs. Some spices achieve good colour as well. Turmeric (yellow) and paprika (salmon-like) are two examples. Petals etc. (like dried lavender) can be successfully 'pressed' onto the surface of the soap after pouring, before covering and insulating, although keep your gloves on when doing this as the mixture is still caustic at that stage. Generally food-safe colours are not suitable for natural soap-making (there are some exceptions). There are colours that work well and are simple to use (see tip above). Procedure as follows...
All ultramarines and oxides require mixing with a little water and can be added at any stage after all ingredients are in the soapmaking pan together, up to the trace.
Some types of pigments (known as insoluble pigments) are NOT water soluble and give colour to soaps best in warm oils. Add the powder or dispersion to melted coconut/palm oil and whisk in very thoroughly to avoid any 'spotting'.
Ground Spices are basically in 2 varieties. Those that will add colour to the oils (Turmeric and Paprika) which can be added to the warm oils similar to Lakes and those that simply add colour by suspension (i.e. gound cinnamon) which are best added near the trace in a little olive oil as a runny paste.
With ALL colours/pigments, the depth of colour will vary with the amount added. Keep colours subtle to avoid bleeding of colour into the lather when using the soaps. Mix up enough in a little water (except insoluble pigments) and add a bit at a time until the depth of colour you want is apparent. Guide for this size recipe... All ultramarines/oxides max 1 tsp (5ml). Most food-safe water soluble powders max 1/4 tsp (1.25ml). Lakes max 1/4 tsp (1.25ml). These are a guide only.
If you want to enrich your soap with specific oils for their properties (maybe hempseed or wheatgerm etc.) use aprox 1 Tbsb (15ml) at trace. Honey, also aprox 1 Tbsb (15ml) at trace. Exfolients, i.e. oatmeal or similar, up to 1/4 cup (60ml). at or before trace. Take care to ensure your soap is thick enough to 'support' any exfolient additions before pouring or they may sink or float (depends what they are).
GUIDE TO SAP VALUES


